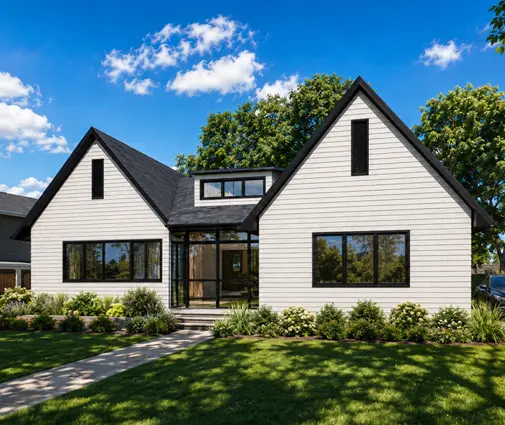
The most common mistake with a storey-and-a-half house is buying the square footage on the drawing and forgetting the ceiling. A plan says 1,700 sq ft, but part of the upper floor sits under a slope where you can't stand. In Canada we often call this a storey-and-a-half or a Cape Cod. In Poland it is the dom parterowy z poddaszem użytkowym, a bungalow with a usable attic. In Romania it is P+M, parter plus mansardă. In Germany it is a house with a Dachgeschoss. Across the border in the US, it is the Cape Cod or a bonus room over the garage.
Europeans have built this way for generations, and their rules on measuring, pitches and costs hold useful lessons for a Canadian family. The eight steps below walk through the decision, from the first sketch to the permit.
Step 1: Define what you actually want under the roof
Start by deciding what the upper floor is for. Is it the main bedrooms, or space for kids, guests and a home office? In Poland and Romania the attic usually holds all the bedrooms, and the main floor is living space plus one small room. Canadian Cape Cods often follow the same pattern. Many families here, though, want the primary bedroom on the main floor so they can age in place.
Time: one to two weeks of discussion and browsing. Cost: nothing but your evenings. A good place to start is the storey-and-a-half house plans in the catalog.
Step 2: Do honest floor-area math for sloped ceilings
This is where the countries differ most, and where Canadians should borrow the European habit of counting carefully.
- Germany: the Wohnflächenverordnung counts floor under 1 m of height as zero and floor between 1 m and 2 m at half. Only floor under 2 m or more counts in full. A Dachgeschoss often "loses" 15 to 30 percent of its gross area.
- Poland: the commonly used PN-ISO 9836 method counts area under 2.20 m in full, area between 1.40 m and 2.20 m at half, and area under 1.40 m not at all.
- Romania: the mansardă is also measured with height limits, and buyers know that usable area falls well short of the footprint.
- Canada and the US: there is no single national rule for marketing square footage. Builders, appraisers and real estate boards use different conventions, and some count floor right out to the knee wall.
The practical lesson: ask how the upper floor area was measured, and sketch where your ceiling drops below about 5 ft. Building codes in Canada also set minimum ceiling heights over part of each bedroom and living area. Confirm the current figures for your province with your municipality or designer.
Time: a few hours per plan. Cost: free.


Step 3: Choose the roof pitch and knee wall height
Usable attic space depends almost entirely on two numbers: the roof pitch and the height of the knee wall.
- Poland: usable-attic houses typically use 35 to 45 degree roofs with knee walls of about 1 to 1.5 m.
- Germany: a classic Satteldach is around 38 to 45 degrees. Local development plans (Bebauungsplan) often fix the pitch and knee wall height.
- Romania: P+M houses also use steep roofs, though local urban planning rules on height shape the result.
- Canada: storey-and-a-half homes usually run from about 9/12 to 12/12, roughly 37 to 45 degrees.
A taller knee wall (3 to 4 ft) gives much more standing room upstairs, but it also raises the overall height. Many Canadian zoning bylaws cap building height or count storeys in ways that matter, so check yours before you fall in love with a steep roof. A European-style plan such as this half-timbered three-bedroom home of 1,722 sq ft shows how a steep roof can carry a real second level.
Time: one to two weeks with a designer. Cost: usually part of the design fee.
Step 4: Compare the cost: attic or full second floor?
Is an attic cheaper than a second floor? Per usable square foot, often not by much. Per house, it can be.
A storey-and-a-half saves on wall framing, cladding and windows on the upper level. Its main cost is a larger, steeper roof that requires more labour. It also adds dormers, valleys and more complex insulation. A full two-storey on the same footprint gives you more usable area for a small increase in the shell budget, because walls are cheaper than roof.
In Poland and Germany, builders often say that once you add generous dormers, a usable attic costs close to a full floor. That holds in Canada too. In 2025, many Canadian custom builds came in at roughly $250 to $400 CAD per sq ft outside the most expensive markets, and higher around Vancouver and Toronto. Ask your builder to price both versions of the same footprint per usable sq ft, not per gross sq ft.
Compare a compact attic home like this three-bedroom cottage of 1,046 sq ft with a full two-storey Craftsman such as this three-bedroom, 2.5-bath plan of 1,616 sq ft.
Time: two to four weeks to gather quotes. Cost: free, though some builders charge for a detailed estimate.
Step 5: Decide between dormers and roof windows
Germans and Poles use roof windows (Dachfenster, okna dachowe) heavily, because they are cheap and bring a lot of light. Canadian and US Cape Cods lean on dormers, which add both light and real headroom.
| Option | Gains headroom | Rough 2025 cost in Canada | Watch out for |
|---|---|---|---|
| Roof window or skylight | No | About $1,500 to $4,000 installed, each | Summer heat gain, flashing, snow cover |
| Gable dormer | Some | Often $8,000 to $25,000 each in new construction | Valleys that hold snow |
| Wide flat-roof or wall dormer | A lot | Higher, depending on width | Low-slope roofing, drainage |
These figures are rough and vary by region, so get local quotes. Browse house plans with dormers to see how the dormers line up with the rooms behind them.
Time: one week. Cost: included in design.
Step 6: Plan for snow loads, ice dams and summer heat
This is the step where Canada differs most from Romania or western Germany. Roofs here are designed for the ground snow load of your location, using climatic data in the National Building Code or your provincial code (OBC, BC Building Code, Quebec's code). Dormers and valleys create spots where snow drifts and builds up, and your engineer or truss designer must account for them.
The bigger day-to-day risk is the knee wall. Warm air leaking into the small attic spaces behind it melts snow, and the meltwater refreezes at the eaves as ice dams. Careful air sealing, continuous insulation and a vented roof deck (or a well-designed unvented assembly) are essential. In summer, the same sloped ceiling becomes the hottest room in the house. Plan for a ducted heat pump or a ductless head upstairs, and an HRV with supply to the bedrooms. In BC, Step Code targets make airtightness testing part of the process anyway.
Time: part of design and engineering, about two to four weeks. Cost: engineering fees often run a few thousand dollars, depending on the project.


Step 7: Lay out the floor plan the European way
A few layout ideas travel well from Warsaw, Munich and Cluj to a Canadian suburb or acreage:
- A bedroom on the main floor. Polish usable-attic plans almost always include a small main-floor room with a bathroom next to it. In Canada that room works as a guest room, an office, or a future primary bedroom for retirement. A plan like this four-bedroom home of 1,192 sq ft shows how a high bedroom count fits a small footprint. Check the floor plans to see which rooms sit on each level.
- A bathroom under the ridge. Put the upstairs bathroom where the ceiling is tallest, so the shower and vanity get full height. A tub can slide under the slope, since you sit in it. Larger families can look at this four-bedroom, 3.5-bath cottage of 1,695 sq ft.
- Storage in the knee walls. The low triangle behind the knee wall is ideal for built-in drawers and seasonal storage. Keep that space inside the insulated envelope, so you aren't storing things in a cold zone with an access hatch that leaks.
- Stairs stacked under the ridge, so you arrive upstairs at full height.
Families that want more space can look at a farmhouse-style option such as this three-bedroom home of 1,701 sq ft. Another way to get space under a roof is a bonus room over an attached garage, the North American alternative to the full attic. It is also worth looking at this four-bedroom lake-style cottage of 1,389 sq ft. Don't forget the full basement that Canadian frost depths usually make sensible. It can hold the rec room and mechanical space, which frees the attic for bedrooms.
Time: two to six weeks of revisions. Cost: plan modifications vary widely, so ask your designer.
Step 8: Engineering, energy compliance and the permit
Once the layout is set, the drawings go to a truss or rafter designer and, where needed, an engineer. You will also need an energy compliance path for your province and a building permit from your municipality. Timelines vary a lot. A small township may issue a permit in a few weeks, while busy cities can take months. Confirm current requirements and fees with your local building department before you set a construction date.
Time: about one to four months. Cost: permit and development fees range from a few thousand dollars to much more in large cities.
Timeline at a glance
| Step | Task | Typical duration |
|---|---|---|
| 1 | Define needs and browse plans | 1 to 2 weeks |
| 2 | Floor-area math | A few days |
| 3 | Roof pitch and knee wall | 1 to 2 weeks |
| 4 | Cost comparison and quotes | 2 to 4 weeks |
| 5 | Dormers or roof windows | About 1 week |
| 6 | Snow, insulation and HVAC design | 2 to 4 weeks |
| 7 | Layout revisions | 2 to 6 weeks |
| 8 | Engineering and permit | 1 to 4 months |
The European lesson for Canadians is simple. Treat the space under the roof as real rooms with real rules. Count only the floor you can stand on, put headroom where people walk, and build the envelope for our winters. If the storey-and-a-half still costs less per usable sq ft than a full second floor on your lot, it is a smart, compact way to build a family home.